
|
|
| . |
| Return to the schoolhouse | Download in Microsoft Word Format | ||
|
|
|
|
|
|
|
|
|
|
|
|
|
|
|
|
|
|
|
|
|
|
|
|
|
|
|
|
|
|
|
|
|
|
|
|
|
|
|
|
|
|
|
|
|
|
|
|
|
|
|
|
|
|
|
|
|
|
|
|
|
|
|
|
|
|
|
|
|
|
|
|
|
|
|
|
|
|
|
|
|
|
|
|
|
|
|
|
|
|
REPOWERING HO SCALE TROLLEYS WITH A-LINE COMPONENTS
By George Huckaby & Joe Delia BACKGROUND Since the founding of the Southern
California Traction Club in 1995, the club has had to develop its own set of
standards for the repowering of HO traction vehicles. This repowering activity has it roots in
the club desire to operate five cars trains of Pacific Electric 1200s, or
"Blimps" all powered. In preparing for this train activity, it
was immediately discovered that occasionally, open frame motors require up to
one ampere to start. Our 4.0 amp Innovator throttles would not
like that, even if another train or car was not in the same circuit. Then, after we located the Kato automatic
couplers, developed a way to use them,
(See Trolleyville Schoolhouse Lesson 1 in Room 4) and trained up some cars,
it became obvious that the cars need to run at approximately the same speed. To
our surprise, similar cars from similar frames of manufacture had widely
differing speeds, although they all seemed to run smoothly individually. After
several attempts, the club initially settled on the Sagami manufactured motors,
initially using 22361-9 and 22340-9 motors. These motors with their 22mm
diameter and 2.4 mm shafts, were ideal replacements for
the open frame motors. The 22361-9 motor was rated at 9800 rpm at 12 volts and
.075 ampere. The 22340-9 was rated at 9800 rpm and the same voltage and ampere
rating. The difference between these two motors in identical cars was noticeable
but not a problem. The Sagami 22340-9 motor became the motor of choice except
where space was a problem. The club was in the process of converting most of
their Pacific Electric Suydam cars with these motors when they became
unavailable. When this happened, the
club desperately turned to A-Line's Joe D'Elia for help. A-Line was importing
Mashima motors and produced a line of drive line parts so this seemed to be an
excellent place to start. We
discovered that the A-line 40321 motor was rated at 9500 rpm at 12 volts. So
cars equipped with this motor would be compatible with those already repowered
with the Sagami motors. Note the table later in this lesson comparing the
various motors. But, the A-line motor had a 2.0-mm shaft versus the 2.4-mm shaft
of the Sagami motors and the open frame motors that they replaced. So after some adjustments, including the
development of the 2.0 to 2.4 mm sleeve, we found the A-line motor to be an
excellent performer. After many years, these Mashima motors have performed equal
to or better than the both the Sagami 22361-9 and 22401-9 motors.
Note: At
this time, we still prefer the A-line 40321 motor but so far the NWSL 20325-9
motors have been adequate. The lone 40324 motor so far used has also performed
well, running for eight hours at a time on the Custom Traxx traction
demonstration module at shows. As soon as any new motor appears on the scene
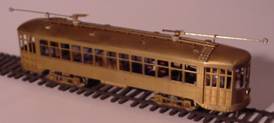
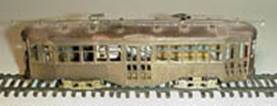
that has traction applications, we will be trying these also. Many fine HO scale streetcar models were
produced in the 1960's and 1970s by such firms as Fairfield, Model Tramway, S.
Soho and Company and Pacific Traction. These cars all have some similar traits.
They have excellent brass bodies, crafted of very solid brass, open frame motors
and, usually, spring belt drive. Several of these vintage models, some of which
have never been run, have been offered for sale lately, especially on Ebay. In
December 2001, we obtained a pristine We do not present this method as the
only way to repower or the best way to repower. Some readers may have a vastly
superior method of repowering cars, but, as of this writing, these methods have
not been shared with the Trolleyville editors. The repowering method that we will
describe in this lesson will work in the majority of all brass double truck
interurbans and many streetcars. For those cases, ingenuity is the order of the
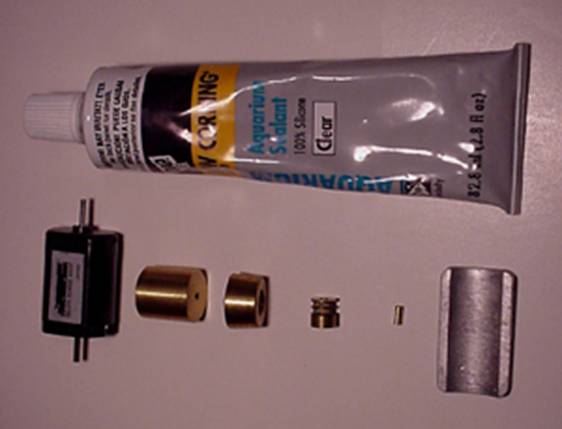
day. But for the majority of HO scale electric vehicles, below are a list and a
photo of all the items that you would need for such a successful repowering.
The list of parts includes the following: 1 - A-Line 40321 18mm by
33mm flat can motor
[Alternates are NWSL 20325-9 motors with 9500 rpm rating 1 - A-Line 20006 flywheel
(Cylinder)
[Alternates are A-Line 20021 flywheel (Trapezoid Shaped)**] 1 - Original Motor Pulley (removed from
original motor shaft) 1 - A-Line 12053 2mm to
5/32 sleeve 1 - A-Line 12401 Motor
Cradle 1 - A-Line 20010 Flywheel
Cement *** 1 - Tube DAP DOW Corning Clear 100%
Silicone Clear Aquarium sealant *used when interior height does not permit use of the 40321
and shown in the photo below. **used when space does not permit
use of the 20006 flywheel. ***used to affix the 12053 sleeve and the 20006 flywheel to
the motor shaft and shown in the right photo.
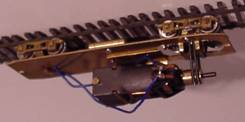
The next two photos are of the
Before we removed the body shell, we
gave the entire unit a thorough two-rail test. This was to ensure that the
wheels are in gauge and that there was no problem with the power truck. One of
the problems with spring belt drives is that if they
have been idle for a long period of time, they will sometimes end up with an
almost permanent bend in the belts where they were wrapped around the upper and
lower pulleys. These spots will either work themselves out after a period of
operation or they will have to be replaced. If the belts have really
deteriorated, they will break and have to be replaced anyway. Replacement belts
are available from Alpine Division Scale Models, PROCEDURE STEP 1. The first step
is to measure the distance between the original horizontal motor shaft and the
car floor. Record this distance, as you will want to attempt to maintain this
distance, if possible, with the replacement motor shaft. STEP 2. Now remove the
old motor from the car floor and all mounting hardware. Unsolder all motor
connections to the floor, the rear truck and any other connections, if they
exist. Clean the floor carefully and thoroughly, as you will be using adhesives
to hold the motor and or cradle to this floor later.
STEP 3. Remove the
motor pulley from the old motor by loosening the setscrew. Set the pulley aside.
You will use it on the new motor. STEP 4. Take the 12053
sleeve and place it on the 40321 motor shaft on the
same end as the electrical connections. Place only 2/3 of the sleeve on the
shaft and secure with the 20010 flywheel cement. Note: Some modelers
have used a small dab of ACC to secure sleeves and flywheels. This can have
serious consequences if the parts turn out to be in the wrong place and must be
re-positioned. Also a
little bit an errant ACC can get into the motor bearing and completely ruin the
motor. We feel that A-line Flywheel
Cement is much more suitable for this role. The A-line 40321 and 40322 motors have
motor shafts that are much shorter than the open frame motors or the Sagami
motors that were initially used. The
original open frame motors and the Sagami motors all had 2.4 mm motor shafts.
The original motor pulleys were designed for these 2.4 mm shafts. The A-line
motor 2.0mm shafts require the use of the #12053 sleeves. These sleeves were developed by Joe
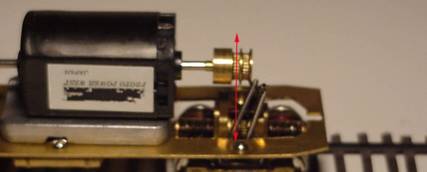
D'Elia at the request of the club just for these repowering efforts. STEP 5. Install the
20006 flywheel on the motor shaft opposite the pulley as close to the motor
casing as possible. Use the 20001 flywheel only when there is insufficient room
for the 20021. Both the 20006 and 20021 flywheels are designed to fit a 2.4mm
shaft without use of the 12053 sleeve. STEP 6. Install the
12401 cradle as close to the power truck as possible, ensuring that the cradle
does not foul the swinging truck or the worm gears.
Due to the low roofs of some city cars,
such as the
After the original lesson was written,
we began experimenting with the Northwest Short Line 20325-9 motors, also rated
at 9500 RPM. This experiment was
begun after the weight and low center of gravity advantages of using the cradle
was being discovered. The weight and
the location of the cradle have significant effect on car performance through
sharp curves and turnouts. The open
frame motors that we were replacing weighed between 1.4 and 2.9 oz. The A-line 40321 motor weighs 1.4 oz; the
40322 motor 0.9 oz and the 40324 motor 0.7 oz.
In the original conversions in Suydam Pacific Electric 1200 series cars,
there was little or no weight loss with the replacement of the motors with the
40321. There was also plenty room inside the car for the A-line 40321 with the
33.0 mm height and any additional weight needed. The 40321 was not going to fit
inside the low roof of this many city cars.
If the motor did fit, it occasionally contacted the roof of the car,
resulting in excessive noise during operation. In the original lesson, we fashioned a
special mount for the motor using rubber and fit the motor into the car. After
some running time, the car did not perform as expected. The car needed
additional weight to track well through city curves and specialwork and there
was little room to place it. It was here that we discovered the true excellence
of the A-line cradle. The cradle placed 1.0 oz of weight exactly where it was
needed. Streetcar models are smaller and weigh much less than interurban cars.
The average remotored Suydam PERy 1200 was 11.5 oz while the highest weight of a
B&QT Double End Peter Witt Car with cradle was 7.1 to 7.4oz. Weight of these
smaller cars is much more critical, especially since the drag of the trolley
pole will have to be overcome in operation. Since the use of the A-line cradle,
with its 1.0 oz weight, satisfied that need, we went looking for another motor
that would fit both on the cradle and inside the car.
The A-line 40324 motor, currently available, was not available at the
time of these conversions, so we used the NorthWest Short Line 20325-9 motor,
which had a height of only 20mm.
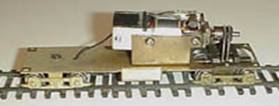
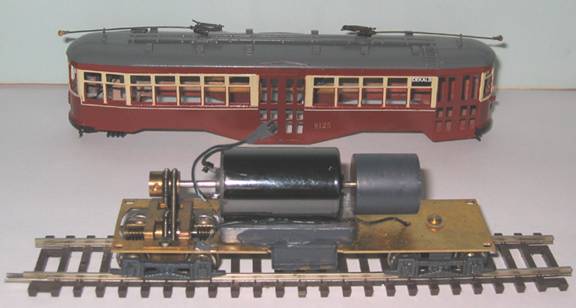
This 20325-9 motor also has 2 mm shafts, so use of the 12053 A-line sleeve was also required. The NWSL motor was then affixed to
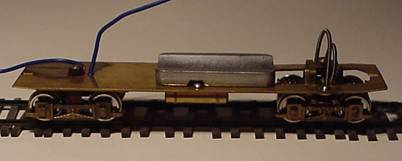
the cradle using Aquarium sealer. The specific car used for this remotoring
method, a Fairfield Brooklyn 8000 series Peter Witt, numbered 8125, was
certified by the SCTC for operation at 30 scale miles per hour (smph) at 7.0
volts. Since that time two other identical Brooklyn Peter Witt cars have been so
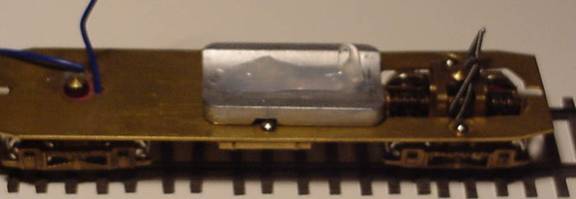
converted. They certified between 28 and 30 smph each. The completely converted
chassis with A-line motor 40321, cradle 12401 and flywheel 20006 is shown in the
next photo:
Two more identical cars were so
converted about one year later and certified at the variance
being due mainly due to the difference in tensions of the spring belts.
Again, because we were so pleased with the performance of Mashima motors, we
decided to test the new A-line 40324 motor, when it became available. There was
no way to fit the A-line 40321 motor into a Custom Brass Third Avenue Railway
System 400 series semi-convertible due to the inward curving sides. The 12401
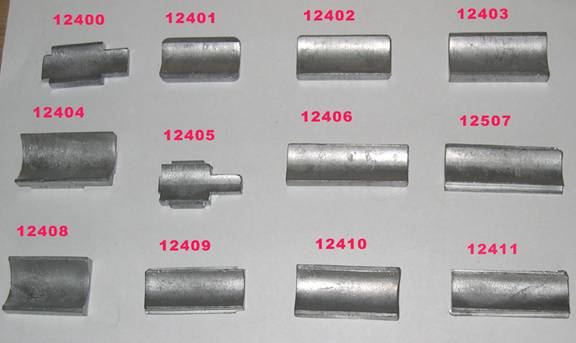
cradle could not be used. At that time of this article, the 2003 A-line catalog
shows 14 cradles, stock numbers 12400 through 12413, that
were originally intended for re-motoring of Athearn and Rail Power Products
diesel locomotives. Note: We
normally mount the cradle to the frame with DAP Aquarium sealer. In most cases,
we must file some of the cradle away to clear some of the screws holding
underbody equipment. After waiting
at least six to twelve hours, we will then mount the motor to the cradle. As of
this date, we have not have either a cradle or motor work its way loose. Twelve of these cradles are shown in the
next photo.
We found the 12401 cradle works in most traction repowering applications. But in the case of the TARS car with its narrow body, we had to modify another cradle, the 12400 by removing the winged sides so that the cradle and motor should fit inside this body.
This motor also has 2.0 mm shafts, so use of the 12053 A-line
sleeve was also required. This car also certified at 26 mph, a perfect
speed for the SCTC city modules. STEP 7.
Take the motor-sleeve-pulley combination and place it in the cradle such that
the two knurled portions of the pulley are directly over the similarly knurled
pulley in the power truck. Ensure
that the horizontal distance between the motor shaft is the same or slightly
greater than the measurement taken earlier.
Note: At this time, it is best to make the electrical connections to the motor
as it will be difficult to solder to the lower terminal once the motor is
secured to the cradle. Note: Electrical connections are discussed thoroughly in a separate lesson on
Wiring Trolley Cars for Overhead Wire Operation. The SCTC uses trolley pole reverse and
overhead wire power so Miniatronics #50-001-02 2-pin connectors are used to
connect the motor to the chassis. At this point, the female end of the connector
is attached to both motor leads. Normally, the white striped wire is connected
to the '-' lead of the motor and eventually to the rear trolley pole pivot. But
testing before final assembly is prudent. STEP 8. At least six hours after the cradle was secured to the chassis with DAP Dow Corning Aquarium sealer, secure the motor to the cradle using the Aquarium sealer. Place some sealer in the middle of the cradle as shown below:
STEP 9. Press the flywheel - motor -
pulley assembly into the aquarium sealer. Line up the two pulleys and clean up
the excess sealer that will seep out from under the motor. Do not allow the sealant to attach itself
to the flywheel. Do not allow the
sealant to get into the worm gear of the power truck.
Allow the sealant to cure at least twelve hours before attaching the
spring belts. Note:
Pulleys were imported in various sizes from about 7.0 mm to 9.0 mm. Adjustments in speed can be made by
changing pulleys. The larger the pulley, the faster the car, all other things
being the same! STEP 10.
Once the sealer has cured, reattach the spring belts, paint the flywheel and
pulley flat black. Finish all
chassis painting, reattach to the body both physically and electrically and the
repowering is completed.
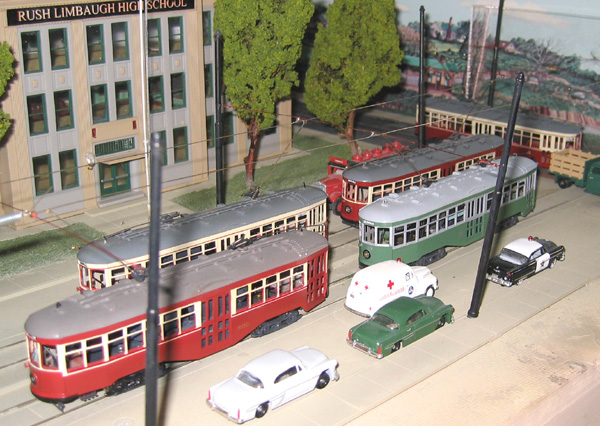
This car, still unpainted at the time, ran its first miles at the All Brass Show
in Ontario on January 20, 2002 and has been running fine ever since.
Since then four more similar cars have been converted, painted and
finished. The current fleet of the five
Happy Conversions! |
|||||||||||||||||||||||||||||||||||||||||||||||||||||||||||||||